
This guide provides a basic introduction to Ext JS. We will discuss getting started with a very simple “Hello World” example. We will then move on to how code is structured in Ext JS. This guide also contains links to many other valuable resources, so be sure to visit as many as you can so your introduction to Ext JS is positive and successful!
Hello World
It’s very easy to get started with Ext JS 5! Simply create an
index.html
file that references the JavaScript and CSS files from our CDN as shown below:
<!DOCTYPE html>
<html>
    <head>
        <title>Welcome to Ext JS!</title>
       <link rel="stylesheet" type="text/css" href="http://cdn.sencha.com/ext/trial/5.0.0/build/packages/ext-theme-neptune/build/resources/ext-theme-neptune-all.css">
       <script type="text/javascript" src="http://cdn.sencha.com/ext/trial/5.0.0/build/ext-all.js"></script>
       <script type="text/javascript" src="http://cdn.sencha.com/ext/trial/5.0.0/build/packages/ext-theme-neptune/build/ext-theme-neptune.js"></script>

        <script type ="text/javascript" src="app.js"></script>
    </head>
    <body></body>
</html>
Other libraries such as jQuery or AngularJS involve declarative HTML markup.
Ext JS takes a different approach. You’ll be writing almost exclusively in JavaScript and utilizing our internal Class System. You can see an example of our code structure below.
Ext.create('Ext.Panel', {
     renderTo     : Ext.getBody(),
     width        : 200,
     height       : 150,
     bodyPadding  : 5,
     title        : 'Hello World',
     html         : 'Hello <b>World</b>...'
 });
Let’s incorporate the above Panel object into your blank
app.js
file you included in your
index.html
file’s head. Now, if you were to simply add the above code to a set of script tags, it would likely fail since the framework wouldn’t be fully loaded. That’s why we use the Application Class’s
launch()
function. This will fire as soon as the framework is ready for use.
All we need to do is place the above code inside of the Ext.app
launch()
function.
The resulting
app.js
file will look like this:
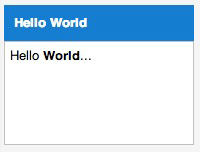
Ext.application({
    name   : 'MyApp',

    launch : function() {

       Ext.create('Ext.Panel', {
            renderTo     : Ext.getBody(),
            width        : 200,
            height       : 150,
            bodyPadding  : 5,
            title        : 'Hello World',
            html         : 'Hello <b>World</b>...'
        });

    }
});
Upon refreshing your page, you should see this panel:
This example illustrates how simple it is to get started with Ext JS 5. The sky’s the limit from here! You can explore the many capabilities of Ext JS 5 by viewing our many examples . They give a great introduction to the framework’s tools and abilities.
ext-all.js
It should be noted that the CDN’s ext-all.js and ext-theme-neptune.css in the above
index.html
contains the entire Ext JS framework. This is suitable for experimentation, but you will want to to compile a subset of the framework for production releases. Doing so creates smaller minified files based solely the classes your application needs.
You can review our Getting Started guide for a more thorough introduction to building an application with Ext JS 5 and Sencha Cmd.
If you are not using Sencha Cmd, you may want to vary the CSS/JS files you choose to include your index.html file.
Ext JS
- ext.js : Minified. Base framework that dynamically loads extended classes.
- ext-all.js : Minified. Includes entire framework.
- ext-all-debug.js : Not Minified. Includes entire framework
- ext-debug.js : Not Minified. Base framework that dynamically loads extended classes.
What is Ext JS?
Ext JS 5 is a JavaScript application framework that provides you with a full suite of tools for creating cross-platform applications. Ext JS 5 supports all modern browsers, from IE8 to the latest release of Chrome and everything in between.
Ext JS is an Object Oriented, Class-Based Library, which means it’s designed to allow your application to scale from a single developer up to a multi-team enterprise. Let’s break down some of these concepts in case you are unfamiliar with the terminology.
Object Oriented Programming
Object Oriented Programming (OOP) is a modular way of setting up your code that makes for reusable bits and pieces. This also makes your code more maintainable than the common “in-line” script coding associated with many other JavaScript libraries.
Rather than making one huge program, said program can be broken into connecting parts, which ultimately, makes things far easier to maintain and scale.
Read more about the basics of OOP .
Classes and Objects
The key concepts of OOP include classes and objects. A class is an abstract definition of a component of your application. This is a simple abstraction of a base level “thing”. This class may then be instanced as an object of said class. At that point, the object contains all of the information from the abstraction, in addition to any other pieces that were extended.
Let’s create another example that demonstrates the Ext JS class system. We’ll begin with the same basic
index.html
and
app.js
files discussed above.
Instead of creating an object, let’s define a Class that we will then create.
We can define the custom panel like this:
Ext.define('MyApp.MyPanel', {
    extend : 'Ext.Panel',
    title  : 'Hello World',
    html   : 'Hello <b>World</b>...'
});
As you can see, we’ve defined something called ‘MyPanel’, which extends the Ext JS Panel class,
Ext.Panel
. Now we can use this as a “template” for creating new instances of
MyApp.MyPanel
.
Perhaps we want two panels and the only difference between them is the text. We can create two instances of MyPanel and assign differing text and html configs. Your code in
app.js
would look something like this:
Ext.define('MyApp.MyPanel', {
     extend      : 'Ext.Panel',
     width       : 200,
     height      : 150,
     bodyPadding : 5
 });

 Ext.application({
     name   : 'MyApp',

     launch : function() {

         Ext.create('MyApp.MyPanel', {
             renderTo :Ext.getBody(),
             title    : 'My First Panel',
             html     : 'My First Panel'
         });

         Ext.create('MyApp.MyPanel', {
             renderTo : Ext.getBody(),
             title    : 'My Second Panel',
             html     : 'My Second Panel'
         });
     }
 });
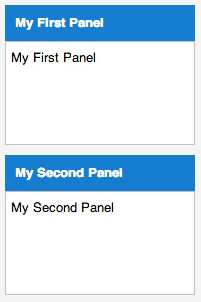
As you can see, this functionality lets you reuse the same code “base” but still make changes as needed. While this is a simple example, using and extending Ext JS Classes is a very powerful mechanism and will help you create clean and maintainable code.
You can read more about the internals of our Class system here.
Note:
This “in-line” approach is for example purposes only. If you were composing a real application, you would have your view in a separate file
MyApp.view.MyPanel
. Additionally, your create statements would be in a
controller
or
launch()
function.
You can read more about Application Architecture here .
Beyond Hello World
You have now seen the code needed to create simplistic “Hello World” examples in Ext JS.
If you’re new to Sencha frameworks, it may look like slightly more syntax that you may normally need to create something so simple. That said, let’s look at the grid so you can see how most real-world situations utilize a very small amount of syntax to create truly impressive output.
In this example, we’ll produce a
Ext.grid.Panel
, which contains a row editing plug-in and a couple of rows of data. To view this sample, simply replace the contents of your
app.js
file with the following code:
Ext.application({
    name   : 'MyApp',

    launch : function() {

        Ext.widget({
            renderTo : Ext.getBody(),
            xtype    : 'grid',
            title    : 'Grid',
            width    : 650,
            height   : 300,
            plugins  : 'rowediting',
            store    : {
                fields : [ 'name', 'age', 'votes', 'credits' ],
                data   : [
                    [ 'Bill', 35, 10, 427 ],
                    [ 'Fred', 22, 4, 42 ]
                ]
            },
            columns: {
                defaults: {
                    editor : 'numberfield',
                    width  : 120
                },
                items: [
                    { text: 'Name', dataIndex: 'name', flex: 1, editor: 'textfield' },
                    { text: 'Age', dataIndex: 'age' },
                    { text: 'Votes', dataIndex: 'votes' },
                    { text: 'Credits', dataIndex: 'credits' }
                ]
            }
        })
    }
});
Once you refresh the browser, your output should look like this:

What you see here is a fully functional Ext JS grid . This grid has sortable, drag-able, movable columns. These columns can be shown and hidden by utilizing the column option under the grid header’s drop-down menu. This grid also contains a row editor that is activated by double-clicking any row. These rows contain editable number and text fields with a helpful and attractive user interface.
The truly amazing thing is that you get this in roughly 30 lines of code. Much of this functionality comes with the grid by default, which means less time spent adding functionality. The only thing added to this example is the row editor, which only needs a single line config to be added to your grid.
This should illustrate how much time Ext JS can save you once you’re familiar with the syntax. In the end, you save time and the user gets a feature-rich experience with your application.
Note: In a real world example, you would use a separate store and model to feed your grid data.
You can read more about Ext.data.Store and Ext.data.Model in our Application Architecture guide.
Next Steps
Now that you’ve seen how simple it is to get started, you can start reviewing some of our other guides to move forward with Ext JS.
You can find all of our Ext JS 5 documentation here .
Guides of interest for next steps would be:
Make sure to check the
forums
for lots of information.
You can also ask questions as you begin your journey with Ext JS!