This guide is intended for any developer who wants to create new or extend existing classes in Ext JS 4.x and 5.x.
Overview
Ext JS 5 ships with more than 300 classes. We have more than 2 million developers to date and they come from various backgrounds and locations. At that scale, we face a big challenge in providing a common code architecture that is:
- Familiar and simple to learn
- Fast to develop, easy to debug, and painless to deploy
- Organized, extensible, and maintainable
Because JavaScript is a classless, prototype-oriented language, one of its most powerful features is flexibility. There are multiple solutions to any problem using many different coding styles and techniques. However, this comes with the cost of being unpredictable. Without a unified structure, JavaScript code can be difficult to understand, maintain, and re-use.
Class-based programming , on the other hand, is still the most popular model of Object Oriented Programming. Class-based languages usually requires strong-typing, encapsulation, and standard coding conventions. By making developers adhere to a large set of principles, code is more likely to be predictable, extensible, and scalable over time. However, this model doesn’t have JavaScript’s dynamic capability.
Each approach has pros and cons, but can we keep the good parts of both while hiding the bad parts? The answer is yes, and you can find the solution in Ext JS.
Naming Conventions
Using consistent naming conventions throughout your code base for classes, namespaces and filenames helps keep your code organized, structured and readable.
Classes
Class names may only contain alphanumeric characters. Numbers are permitted but discouraged, unless they belong to a technical term. Do not use underscores, hyphens, or any other non-alphanumeric character. For example:
-
MyCompany.useful_util.Debug_Toolbaris discouraged -
MyCompany.util.Base64is acceptable
Class names should be grouped into packages when appropriate and properly namespaced using object property dot-notation (.). At a minimum, there should be one unique top-level namespace followed by the class name. For example:
MyCompany.data.CoolProxy
MyCompany.Application
The top-level namespaces and the actual class names should be CamelCased. Everything else should be all lower-cased. For example:
MyCompany.form.action.AutoLoad
Classes that are not distributed by Sencha should never use
Ext
as the top-level namespace.
Acronyms should also follow CamelCased convention listed above. For example:
-
Ext.data.JsonProxyinstead ofExt.data.JSONProxy -
MyCompany.util.HtmlParserinstead ofMyCompary.parser.HTMLParser -
MyCompany.server.Httpinstead ofMyCompany.server.HTTP
Source Files
The names of the classes map directly to the file paths in which they are stored. As a result, there must only be one class per file. For example:
-
Ext.util.Observableis stored inpath/to/src/Ext/util/Observable.js -
Ext.form.action.Submitis stored inpath/to/src/Ext/form/action/Submit.js -
MyCompany.chart.axis.Numericis stored inpath/to/src/MyCompany/chart/axis/Numeric.js
path/to/src
is the directory of your application’s classes. All classes should stay under this common root and should be properly namespaced for the best development, maintenance, and deployment experience.
Methods and Variables
-
In a similar fashion to class names, method and variable names may only contain alphanumeric characters. Numbers are permitted but discouraged unless they belong to a technical term. Do not use underscores, hyphens, or any other non-alphanumeric character.
-
Method and variable names should always be in camelCased. This also applies to acronyms.
Examples
-
Acceptable method names:
- encodeUsingMd5()
- getHtml() instead of getHTML()
-
getJsonResponse() instead of
getJSONResponse() -
parseXmlContent() instead of
parseXMLContent()
-
Acceptable variable names:
- var isGoodName
- var base64Encoder
- var xmlReader
- var httpServer
Properties
-
Class property names follow the exact same convention except when they are static constants.
-
Static class properties that are constants should be all upper-cased. For example:
-
Ext.MessageBox.YES = "Yes" -
Ext.MessageBox.NO = "No" -
MyCompany.alien.Math.PI = "4.13"
-
Declaration
The Old Way
If you have ever used any version of Ext JS previous to Ext JS 4, you are certainly familiar with
Ext.extend
to create a class:
var MyWindow = Ext.extend(Object, { ... });This approach is easy to follow in order to create a new class that inherits from another. Other than direct inheritance, we didn’t have a fluent API for other aspects of class creation. This left out things such as configuration, statics, and mixins. We will be reviewing these items in detail later in this guide.
Let’s take a look at another example:
My.cool.Window = Ext.extend(Ext.Window, { ... });
In this example, we want to namespace our new class, and make it extend from
Ext.Window
. There are two concerns we need to address:
-
My.coolneeds to be an existing object before we can assignWindowas its property -
Ext.Windowneeds to exist / loaded on the page before it can be referenced
The first item is usually solved with
Ext.namespace
(aliased by
Ext.ns
). This method recursively transverses through the object / property tree and creates them if they don’t exist. This necessitates adding them above
Ext.extend
.
Ext.ns('My.cool');
My.cool.Window = Ext.extend(Ext.Window, { ... });
The second issue is not easy to address because
Ext.Window
might depend on many other classes. In turn, these dependencies may depend on the existance of other classes. For that reason, applications written prior to Ext JS 4 included the whole library in the form of
ext-all.js
, regardless of whether the application may only need a small portion of the framework.
The New Way
Ext JS 4 eliminated these drawbacks with a single method you need to remember for class creation:
Ext.define
. Its basic syntax is as follows:
Ext.define(className, members, onClassCreated);-
className: The class name -
membersis an object that represents a collection of class members in key-value pairs -
onClassCreatedis an optional function callback that is invoked when all dependencies of the defined class are ready and the class itself is fully created. Due to the asynchronous nature of class creation, this callback can be useful in many situations. These will be discussed further in Section IV
Example:
Ext.define('My.sample.Person', {
    name: 'Unknown',

    constructor: function(name) {
        if (name) {
            this.name = name;
        }
    },

    eat: function(foodType) {
        alert(this.name + " is eating: " + foodType);
    }
});

var aaron = Ext.create('My.sample.Person', 'Aaron');

aaron.eat("Salad"); // alert("Aaron is eating: Salad");
Note:
We created a new instance of
My.sample.Person
using the
Ext.create()
method. We could have used the
new
keyword (
new My.sample.Person()
). However it is recommended to get in the habit of always using
Ext.create
since it allows you to take advantage of dynamic loading. For more info on dynamic loading see the
Getting Started guide
Configuration
In Ext JS 4, we introduced a dedicated
config
property that gets processed by the powerful Ext.Class pre-processors before the class is created. Features include:
- Configurations are completely encapsulated from other class members
- Getter and setter methods for every config property are automatically generated into the class prototype during class creation if methods are not already defined.
-
An
applymethod is also generated for every config property. The auto-generated setter method calls theapplymethod internally before setting the value. You may override theapplymethod for a config property if you need to run custom logic before setting the value. Ifapplydoes not return a value, the setter will not set the value.
For Ext classes that use the configs, Ext JS 5 eliminated the need to call
initConfig()
manually. However, for your own classes that extend
Ext.Base
,
initConfig()
still needs to be called.
You can see configuration examples below.
Ext.define('My.own.Window', {
   extend: 'Ext.Component',
   /** @readonly */
   isWindow: true,

   config: {
       title: 'Title Here',

       bottomBar: {
           height: 50,
           resizable: false
       }
   },

   applyTitle: function(title) {
       if (!Ext.isString(title) || title.length === 0) {
           alert('Error: Title must be a valid non-empty string');
       }
       else {
           return title;
       }
   },

   applyBottomBar: function(bottomBar) {
       if (bottomBar) {
           if (!this.bottomBar) {
               return Ext.create('My.own.WindowBottomBar', bottomBar);
           }
           else {
               this.bottomBar.setConfig(bottomBar);
           }
       }
   }
});

/** A child component to complete the example. */
Ext.define('My.own.WindowBottomBar', {
   config: {
       height: undefined,
       resizable: true
   }
});
And here’s an example of how it can be used:
var myWindow = Ext.create('My.own.Window', {
    title: 'Hello World',
    bottomBar: {
        height: 60
    }
});

alert(myWindow.getTitle()); // alerts "Hello World"

myWindow.setTitle('Something New');

alert(myWindow.getTitle()); // alerts "Something New"

myWindow.setTitle(null); // alerts "Error: Title must be a valid non-empty string"

myWindow.setBottomBar({ height: 100 });

alert(myWindow.getBottomBar().getHeight()); // alerts 100
Statics
Static members can be defined using the
statics
config
Ext.define('Computer', {
    statics: {
        instanceCount: 0,
        factory: function(brand) {
            // 'this' in static methods refer to the class itself
            return new this({brand: brand});
        }
    },

    config: {
        brand: null
    }
});

var dellComputer = Computer.factory('Dell');
var appleComputer = Computer.factory('Mac');

alert(appleComputer.getBrand()); // using the auto-generated getter to get the value of a config property. Alerts "Mac"
Errors Handling & Debugging
Ext JS includes some useful features that will help you with debugging and error handling.
-
You can use
Ext.getDisplayName()to get the display name of any method. This is especially useful for throwing errors that have the class name and method name in their description:throw new Error('['+ Ext.getDisplayName(arguments.callee) +'] Some message here'); -
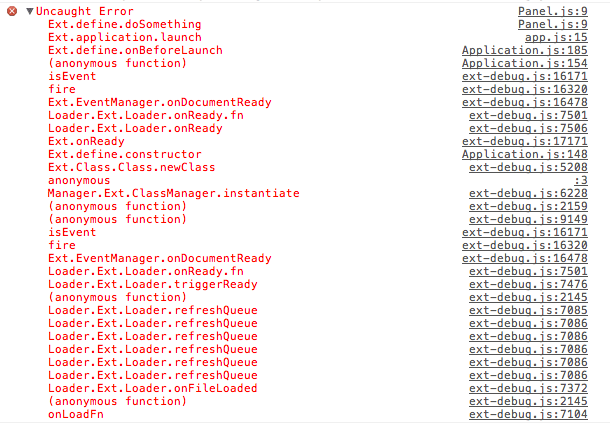
When an error is thrown in any method of any class defined using
Ext.define(), you should see the method and class names in the call stack if you are using a WebKit based browser (Chrome or Safari). For example, here is what it would look like in Chrome: