
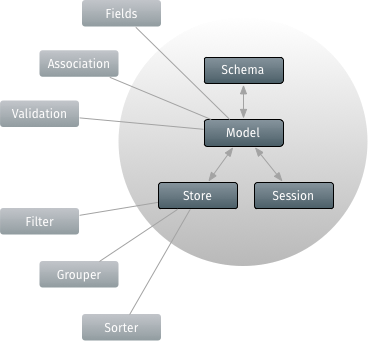
The data package is what loads and saves all of the data in your application. It consists of a multitude of classes, but there are three that are more important than all the others.
These classes are:
The above classes are used by almost every application. They are supported by a number of satellite classes.
Models
The centerpiece of the data package is Ext.data.Model. A Model represents an entity in an application. For example, an e-commerce app might have models for Users, Products and Orders. At the simplest level, a Model defines a set of fields and related business logic.
Let’s look at a few of the principal parts of Model:
- Fields
- Proxies
- Validations
- Associations

Creating a Model
It is usually best to define your models starting with a common base class. This base class allows you to easily configure certain aspects for all of your models in one place. It is also a good place to configure the schema . The schema is a manager for all of the models in your application. For now we’ll focus on two of its most helpful configuration options:
Ext.define('MyApp.model.Base', {
    extend: 'Ext.data.Model',

    fields: [{
        name: 'id',
        type: 'int'
    }],

    schema: {
        namespace: 'MyApp.model',  // generate auto entityName

        proxy: {     // Ext.util.ObjectTemplate
            type: ajax,
            url: '{entityName}.json',
            reader: {
                type: 'json',
                rootProperty: '{entityName:lowercase}'
            }
        }
    }
});
The appropriate content for your model base class, especially its “fields”, will likely differ between applications.
Proxies
Proxies are used by Models and Stores to handle the loading and saving of Model data. There are two types of proxies: Client and Server.
Proxies can be defined directly on the schema of the Model’s base class (as seen above).
Client Proxy
Examples of client proxies include Memory and Local Storage , which uses the HTML5 localstorage feature. Although older browsers don’t support these new HTML5 APIs, they’re so useful that a lot of applications will benefit enormously from their presence.
Server Proxy
Server proxies handle the marshaling of data to a remote server. Examples of this type of proxy include AJAX , JSONP and REST .
Schema
A schema is a collection of entities that have associations with one another. When a model specifies a “schema” config, that schema will be inherited by all derived models. In the above example, the schema has been configured with two values that establish the defaults for all models in that schema.
The first of these configs is the “namespace”. By specifying this namespace all models gain a shortened name call an “entityName”. This short name is primarily useful when defining associations between models which we will see later.
The example schema also defines a “proxy” config. This is an object template which is similar to textual templates based on Ext.XTemplate. The difference is that the object template produces objects when given its data. In this case, that data is used to automate the definition of the “proxy” config for all models that do not explicitly define a proxy.
This is very helpful since it’s likely that every instance of model will need to load its data the same way with slightly different values. This avoids repetitive proxy definitions for each Model.
The
User.json
that we specify in the URL,
url: '{entityName}.json'
, should return a JSON string.
For this example we’ve used this:
{
  "success": "true",
  "user": [
    {
      "id": 1,
      "name": "Philip J. Fry"
    },
    {
      "id": 2,
      "name": "Hubert Farnsworth"
    },
    {
      "id": 3,
      "name": "Turanga Leela"
    },
    {
      "id": 4,
      "name": "Amy Wong"
    }
  ]
}
Stores
Models are typically used with a Store, which is basically a collection of records (instances of a Model-derived class). Creating a Store and loading its data is simple:
var store = new Ext.data.Store ({
    model: 'MyApp.model.User'
});

store.load({
    callback:function(){
        var first_name = this.first().get('name');
       console.log(first_name);
    }
});
We are manually loading the store to receive a set of
MyApp.model.User
records. The records are then logged when the store load’s callback function is fired (upon completion).
Inline data
Stores can also load data in-line. Internally, Store converts each of the objects we pass in as data into records of the appropriate Model type:
new Ext.data.Store({
    model: 'MyApp.model.User',
    data: [{
        id: 1,
        name: "Philip J. Fry"
    },{
        id: 2,
        name: "Hubert Farnsworth"
    },{
        id: 3,
        name: "Turanga Leela"
    },{
        id: 4,
        name: "Amy Wong"
    }]
});
Sorting and Grouping
Stores are able to perform sorting, filtering and grouping locally and remotely.
new Ext.data.Store({
    model: 'MyApp.model.User',

    sorters: ['name','id'],
    filters: {
        property: 'name',
        value   : 'Philip J. Fry'
    }
});
In this store, the data will be sorted first by name and then id. The data will be filtered to only include users with the name ‘Philip J. Fry’. It’s easy to change the attributes for these items at any time via the Store’s API.
Associations
Models can be linked together with the Associations API. Most applications deal with many different Models and the Models are almost always related. A blog authoring application might have models for User and Post. Each User creates Posts. So in this case, a user can have multiple posts, but a post will only have one User creating it. This is known as a ManyToOne relationship. We can express this relationship like so:
Ext.define('MyApp.model.User', {
    extend: 'MyApp.model.Base',

    fields: [{
        name: 'name',
        type: 'string'
    }]
});

Ext.define('MyApp.model.Post', {
    extend: 'MyApp.model.Base',

    fields: [{
        name: 'userId',
        reference: 'User', // the entityName for MyApp.model.User
        type: 'int'
    }, {
        name: 'title',
        type: 'string'
    }]
});
It’s easy to express rich relationships between different Models in your application. Each Model can have any number of associations with other Models. Additionally, your Models may be defined in any order. Once you have a record of this Model type, it’s easy to traverse the associated data. For example, if you wanted to get all of the posts for a user, you could do something like this:
// Loads User with ID 1 and related posts and comments
// using User's Proxy
MyApp.model.User.load(1, {
    callback: function(user) {
        console.log('User: ' + user.get('name'));

        user.posts(function(posts){
            posts.each(function(post) {
                console.log('Post: ' + post.get('title'));
            });
        });
    }
});
The above association results in a new function being added to the Model. Each User model has many Posts, which added the
user.posts()
function that we used. Calling
user.posts()
returns a
Store
configured with the Post model.
Associations aren’t just helpful for loading data. They’re also quite useful for creating new records:
user.posts().add({
    userId: 1,
    title: 'Post 10'
});

user.posts().sync();
This instantiates a new Post, which is automatically given the User’s id in the userId field. Calling
sync()
saves the new Post via its proxy (defined ultimately by the schema’s proxy config). This is an asynchronous operation to which you can pass a callback if you want to be notified when the operation completed.
The “inverse” of the association also generates new methods on the Post model:
MyApp.model.Post.load(1, {
    callback: function(post) {

        post.getUser(function(user) {
            console.log('Got user from post: ' + user.get('name'));
        });
    }
});

MyApp.model.Post.load(2, {
    callback: function(post) {
        post.setUser(100);
    }
});
The loading function,
getUser()
, is asynchronous and requires a callback function to get at the user instance. The
setUser()
method simply updates the
userId
(sometimes called the “foreign key”) to 100 and saves the Post model. As usual, callbacks can be passed in that will be triggered when the save operation has completed - whether successful or not.
Loading Nested Data
When associations are defined, the act of loading a record can also load associated records in a single request. For example, consider a server response like this:
{
    "success": true,
    "user": [{
        "id": 1,
        "name": "Philip J. Fry",
        "posts": [{
            "title": "Post 1"
        },{
            "title": "Post 2"
        },{
            "title": "Post 3"
        }]
    }]
}
The framework can automatically parse out nested data in a single response such as the above. Instead of making a request for the User data and another for the Posts data, we can return all of the data in a single server response.
Validations
Models also provide a bevy of support for validating data. To demonstrate, we’re going to build upon the example we used above. First let’s add some validations to the User model:
Ext.define('MyApp.model.User', {
    extend: 'Ext.data.Model',
    fields: ...,

    validators: {
        name: [
            'presence',
            { type: 'length', min: 7 },
            { type: 'exclusion', list: ['Bender'] }
        ]
    }
});
Validators are defined as an object keyed by field name which map to the rules that define a valid field. These rules are expressed as a validator object config or an array of these configs. The validators in our example validate the name field, which should be at least 7 characters in length, and the value to be anything but “Bender”.
Some validations take additional optional configuration - for example the length validation can take min and max properties, format can take a matcher, etc. There are five validations built into Ext JS and adding custom rules is easy.
First, let’s meet the ones built right in:
- Presence - ensures that the field has a value. Zero counts as a valid value but empty strings do not.
- Length - ensures that a string is between a min and max length. Both constraints are optional.
- Format - ensures that a string matches a regular expression format. In the example above we ensure that the age field consists only of numbers.
- Inclusion - ensures that a value is within a specific set of values (e.g. ensuring gender is either male or female).
- Exclusion - ensures that a value is not one of the specific set of values (e.g. blacklisting usernames like ‘admin’).
Now that we have a grasp on the different validations, let’s try using them against a User instance. We’ll create a user and run the validations against it, noting any failures:
// now lets try to create a new user with as many validation
// errors as we can
var newUser = new MyApp.model.User({
    id: 10,
    name: 'Bender'
});

// run some validation on the new user we just created
console.log('Is User valid?', newUser.isValid());

//returns 'false' as there were validation errors

var errors = newUser.getValidation(),
    error  = errors.get('name');

console.log("Error is: " + error);
The key function here is getValidation(), which runs all of the configured validations and returns a record populated by the first occurring error for each field or the boolean value true for valid fields. The validation record is lazily created and is only updated when requested.
In this case, the first error shows us: “Length must be greater than 7” on the name field.
So let’s provide a name that contains more than 7 characters.
newUser.set('name', 'Bender Bending Rodriguez');
errors = newUser.getValidation();
This user record now fulfills all of the validations. The record exists, it contains more than 7 characters, and the name does not match Bender.
newUser.isValid()
will now return true. When we call
getValidation()
, the validation record will be updated and will no longer be dirty, and all of its fields will be set to true.